This is a guest post from TeamBuildr partner Mike Caro, CSCS of Transylvania University. In addition to being the first head strength coach at Transy, Mike contributes to the NSCA and recently led the small-college round table at NSCA Coaches Con 2016. He is the man.
Part 1: The Facility
No one likes cluttered weight rooms. They’re inefficient and unsafe, especially when your athletes are part of the clutter. In this two-part series, we’ll look at how to create a flow of movement through your weight room and in your program design, increasing the efficiency of your training sessions.
Most of my training sessions take place in an old 800 sq ft. racquetball court. Like most small school strength & conditioning facilities, moving athletes through the weight room in a simple and effective manner is absolutely essential. A good training room setup maximizes time for effective workout routines, allows for equipment to be utilized efficiently, and helps to prevent athletes from fighting for equipment.
Facility flow is most easily attained by designing your weight room from the ground up. While this may not be possible for many of us, there is a simple layout method you can utilize in existing weight rooms. Most strength & conditioning sessions are programmed with the following progression:
- Warm up/mobility
- Weightlifting/strength lifts requiring platforms and/or racks
- Auxiliary work requiring dumbbells, med balls, benches, bands, stability balls, etc.
- Energy system training (EST) requiring med balls, kettle bells, sleds, slam balls, etc. (if done in the facility)
- Pre-hab, warm down
With this in mind, a good facility flow should follow this pattern. As your athletes walk into the weight room, they should immediately find themselves in the area where mobility drills and your warm up will occur. Once the warm up has finished, athletes move to the platforms/racks to do their weightlifting and/or strength lifts. Next, they move to the dumbbell/med ball/kettle bell area for auxiliary and/or energy system training. Lastly, the group will move back to the warm up/mobility area for their pre-hab and warm down, before exiting the facility. Setting up your weight room to follow this progression will help your athletes to flow in and out of the facility easily, allowing them (and the coaches) to put greater energy toward the work being done.
Example facility layout to create flow:
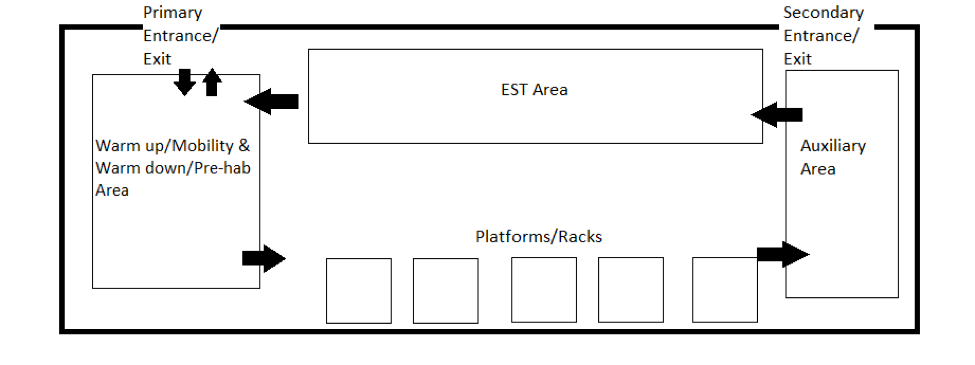
Structuring your facility layout in this way is of great use for facilities where team/group training will overlap. One group can be in the warm up area while the next is using the platforms/racks, and yet another is in the auxiliary area.
Keep in mind that some of the areas in your training room setup can overlap or be dual-purpose. For example, your platform/rack area can also be your auxiliary area. Likewise, your auxiliary and EST areas or warm up/mobility areas can be the same.
Creating a good flow through your facility is a great way of creating efficiency in your program. In the second part of this series I’ll explain how to create flow in the design of your training programs.
Strength & Conditioning Podcast: Matt Nein and Mike Caro

Frontal Plane Fundamentals
