In part 1 and part 2 of this series, we discussed how to progress athletes through both a hang clean and power clean by utilizing a top-down approach. In this article, we will build upon the clean progression to begin teaching athletes the hang snatch.
When starting an introduction to Olympic lifting, I prefer to begin with hang clean progressions and then advance to power clean progressions. Once athletes have mastered the full clean progression, I will introduce snatch in the same fashion, beginning with hang snatch and eventually teaching a power snatch. As previously mentioned in part 2 of this series, hang movements will be initiated from the knee, and power movements will be initiated from the ground.
Snatch is a more technical Olympic lift and often, athletes are nervous to have a barbell pass their face to catch in the correct overhead position. For those 2 reasons, I believe exposing the athletes to cleans first allows them to build some technical proficiency as well as comfort in the Olympic movements, so time spent teaching the snatch can be accelerated. While utilizing a similar top-down approach from our hang clean series, in part 3 for hang snatch we will discuss:
- Body Weight Overhead Squat
- Barbell Overhead Squat
- Snatch Grip Barbell RDL
- Snatch Grip Barbell RDL to knees
- Snatch Grip Barbell RDL + Shrug
- Impossible Snatch
- Hang Snatch
Before getting into the detail of each progression listed above, it is important to note one major difference between cleans and snatches: grip on the barbell. Finding the appropriate grip for a snatch can be tricky for athletes since each athlete may be slightly different. There are multiple ways to find the appropriate snatch grip but my preferred method is to ask the athletes to get a wide, even grip on the barbell and then stand straight up. I will then observe where the bar is sitting on their body. If the bar is resting on their thighs, their grip is likely too narrow. If the bar is up higher than their hips and resting on their stomach, their grip is likely too wide. Once we have adjusted the grip so the bar sits right in the hip pocket, I will ask the athletes to perform a hip hinge movement, similar to an RDL but the bar will stay at the hip instead of letting the bar descend from the hip. This hip hinge movement with the barbell allows for further grip adjustment if the barbell is not sitting right in the hip pocket. Once the appropriate grip is established, I will then begin step 1 of the hang snatch progression.

Let’s discuss each of these steps in detail.
1. Bodyweight Overhead Squat
Unlike adding a bodyweight squat at the end of a warm-up, I would set aside time to complete a body weight overhead squat outside of the warm-up. Overhead squats move the athlete’s center of gravity and therefore do not come as naturally as a bodyweight squat. When performing this initial step, I prefer to use a band instead of a dowel rod. Using a band allows the athlete to pull the band apart during the descent of the squat to increase tension within the body during the movement. I will always demonstrate a bodyweight overhead squat as I talk through it. I keep cues consistent and ordered from the ground up. As I set up for a bodyweight overhead squat, I will cue:
- Feet about hip-width apart
- Bend the knees and hips at the same time
- Sit back like you are sitting in a chair
- Pull the band apart as you squat
- Keep arms by your ears and chest stays up
While an athlete is performing a bodyweight overhead squat, you may notice a few technical errors. Athletes will often try to squat into their toes, which shifts their hips forward, instead of sitting back toward the heels, arms will either move forward or backward instead of staying in line with the ears, or depth of the squat is compromised. All these movements are compensations due to either a lack of mobility or unfamiliarity with the movement. In my opinion, of the flaws listed above, the least alarming is the depth of a bodyweight overhead squat. It is rare for an athlete using the Olympic lifts to supplement their sport to ever be in a situation where a full-depth overhead squat is necessary. As long as the quality of movement is not compromised, I am okay with athletes quarter squatting during this teaching portion.
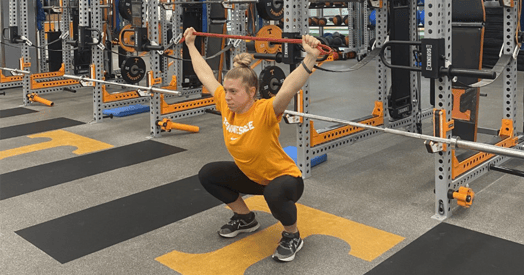
2. Barbell Overhead Squat
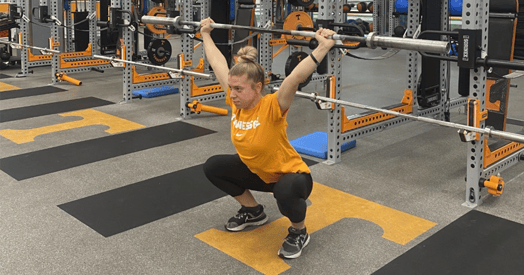
After an athlete can overhead squat using a band, the next progression is a barbell overhead squat. This is the first step where a proper snatch grip will be utilized. When transitioning from a bodyweight overhead squat to a barbell overhead squat, I reinforce the same cues but point out the only difference is having the barbell overhead instead of a band. I cue athletes to try and pull the bar apart as they descend just as with a band to create and keep tension in the body while squatting. I also teach the athletes how to properly miss an overhead squat during this step.
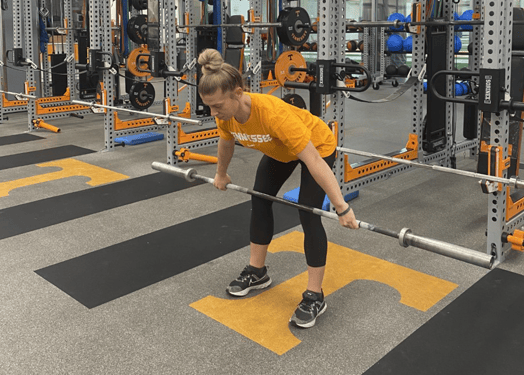
3. Snatch Grip Barbell RDL
Once an athlete has become proficient in both body weight overhead squat and barbell overhead squat, I will move on to a snatch grip barbell RDL. In my opinion, the barbell RDL is the foundation for all other movements in the Olympic lifting progression and therefore must be completed flawlessly to prepare the athlete to Olympic lift properly. When introducing the snatch grip barbell RDL, I do not give athletes an endpoint, but rather let them perform the movement through a full range of motion that does not compromise the quality of the rep. When getting ready to perform a snatch grip barbell RDL the cues I use are:
- Grip the barbell with hands wide and the barbell sitting in the hip pocket
- Feet about hip-width apart
- Slight bend in the knees
- Big chest
- Back stays tight
- Movement comes from the hips
I have found that athletes will often try to perform an RDL by bending their knees instead of pushing their hips back and stretching their hamstrings. In this case, the easiest way to change their movement pattern is to ask an athlete to pick something up off the ground but pretend they do not have knees. Having them demonstrate the task then forces them to move from the hips instead of the knees which translates well to an RDL.
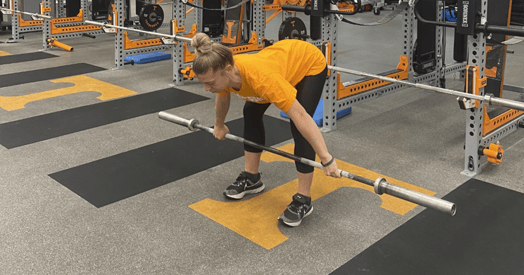
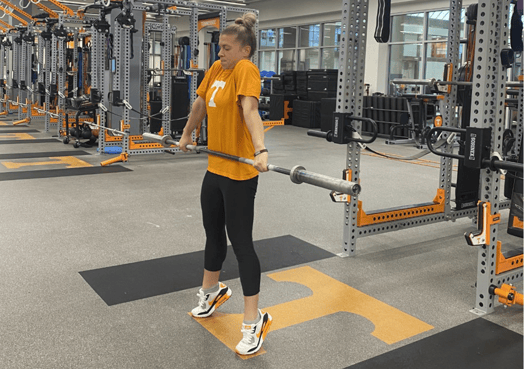
4. Snatch Grip Barbell RDL to knees
On this step, we will limit the range of motion so the RDL stops at the top of the knees. Assuming your athlete has been performing snatch grip barbell RDLs properly in the previous step, this is a quick progression. In this movement, I will cue the same as a regular snatch grip RDL. While an athlete performs a snatch grip barbell RDL to the top of the knees, I am looking for a few points from a technical standpoint:
- Shoulders are in front of the barbell
- Bending of the knee does not change through the range of motion of RDL
- Back is tight
- Barbell is touching the legs and not in front of the athlete
- Weight is distributed through the ball of the foot or toward the heels; toes are not lifted off the ground
5. Snatch Grip Barbell RDL + Shrug
The next progression is adding a shrug or the triple extension piece of the snatch. Since the athlete has been performing RDLs in the previous steps, the addition of the shrug becomes the focus. The snatch grip barbell RDL is performed to the top of the knees in this step; the shrug portion of the lift should be initiated at mid-thigh. If your athletes are wearing shorts that cut off at their thighs, I use that as a cue to understand when to extend. I cue the athletes to shrug once the bar is at the bottom of their shorts. When performing this step, I cue everything as previously mentioned for an RDL but as the shrug is performed I will cue:
- Shrug at mid-thigh
- Extend through ankles, knees and hips
- Bar stays close to body
- Arms stay loose
- Movement comes from shrugging shoulders toward ears -> use your traps
As athletes learn this step, they often want to actively pull the bar up by bending their elbows. This movement breaks all the power we have built to this point and if not corrected, can cause athletes to miss snatches while looping the barbell away from their body. Any error made during this portion is going to be exaggerated more during a snatch than a clean because the room for error while catching a snatch is much less than catching a clean. It will be important for athletes to perform this step properly since it will dictate their receiving position and we do not want to put an athlete at risk for potential injury when going overhead. When an athlete is struggling to understand how to shrug, I ask “What movement do you do when someone asks you a question you don’t know the answer?” And the response is often a shrug of the shoulders up to the ears as if to say “I don’t know”. This cue often corrects the arm bending and makes the connection for the athlete to use their traps instead.
6. Impossible Snatch
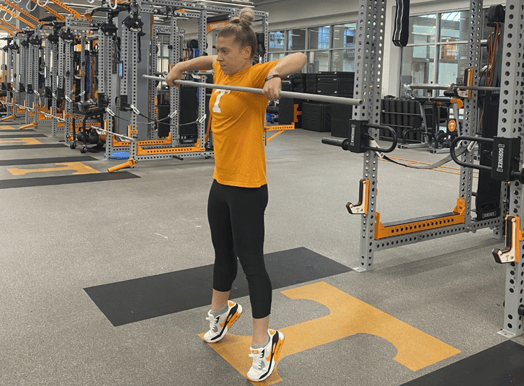
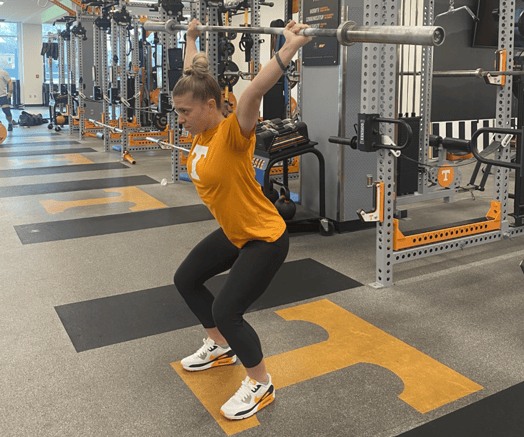
Next is the impossible snatch, contrary to the name, it is possible to perform and teaches a high pull into the receiving position of a snatch. I highly recommend using a PVC pipe or dowel rod for this step since it can be challenging to perform with an empty barbell. In this movement, the athlete will hold the barbell close to the body, while pulling the barbell up as high as possible. Elbows should be above the barbell while bent at roughly 90 degrees. The athlete will then be fully extended and hold the position until cued to receive the bar. A proper catch of the snatch should look like the initial start of an overhead squat. Arms should be fully extended overhead and aligned with the ears, hips are back slightly, and weight is distributed through the whole foot. Once an athlete has received the barbell, ask which previous movement the catch of a snatch looks like. They should be able to make the connection to an overhead squat.
Reinforcing the positioning of a snatch catch by referring to the overhead squat helps athletes to make a connection as to what a proper catch should look and feel like. Once the athletes have caught a snatch, I will ask them to hold the position and then ask if they can properly overhead squat from that position.
7. Hang Snatch
The last step is putting everything together for a hang snatch. In this step, you can break down each segment of the snatch as outlined above for the first set but as you give the athletes more exposure to a hang snatch, allow them to move through at their pace so the lift becomes more fluid and less robotic.
Final tips for success:
- Keep your coaching cues short, simple, and consistent.
- Demonstrate the movement and/or lift for the athlete.
- Use cadence to control the group - especially when working with a larger number of athletes. Cadence forces athletes to hold specific positions which reinforces technique.
- Move around while coaching to see lift from multiple angles.
- Repeat names of movements and lifts to familiarize athletes.
- Ask athletes questions to make sure they are understanding and retaining information.
- Give breaks - if you are speaking for a while, let the athletes put the barbell down.
- How quickly athletes move through a progression will be dependent on the group - use discretion as a coach.


So You Want to Olympic Lift Your Team: Part 4 - The Power Snatch

So You Want to Olympic Lift Your Team Part 2: 6 Steps to Power Clean