In part 1 of this series, we discussed how to progress athletes through a hang clean by utilizing a top-down approach. In this article, we will build upon the hang clean model in order to progress athletes to pulling from the ground for a power clean.
Although I understand both as a weightlifter and coach, the verbiage for Olympic lifting is not solely based on where the lift is being initiated, but for simplicity of understanding as well as more accurately outlining how I teach my own athletes, I will refer to hang cleans as pulling from the knee and power cleans as pulling from the ground.

When beginning an introduction to Olympic lifting, I prefer to begin with hang clean progressions and then advance to power clean progressions. Assuming the same model, I will pick up where we left off from part 1 of this Olympic lifting series. In part 2 we will discuss:
- Clean Grip Deadlift
- Top-Down Positions
- Top-Down + Shrug
- Impossible Clean
- Top-Down Power Clean
- Approach Power Clean
Let’s discuss each step in detail.
1. Clean Grip Deadlift
Since the athlete should be familiar with hang cleans, getting an athlete to properly set up to transition below the knee should take minimal effort. Utilizing a top-down approach, begin with step 4 on part 1 of this series - Barbell RDL to knees. Before initiating the Barbell RDL to knees, check off the following steps in the setup:
- Hands placed evenly on barbell outside the hips
- Feet are about hip width apart
- Chest is big
- Back is tight.
Once the athlete has set up with those 4 cues, initiate the Barbell RDL to the knees. A few points to look for as athlete performs the Barbell RDL to knees:
- Shoulders are in front of the bar
- Slight bend in the knees
- Barbell is touching the legs and not hanging in front of the athlete
- Weight is distributed through the ball of foot or toward the heels; toes are not lifted off the ground
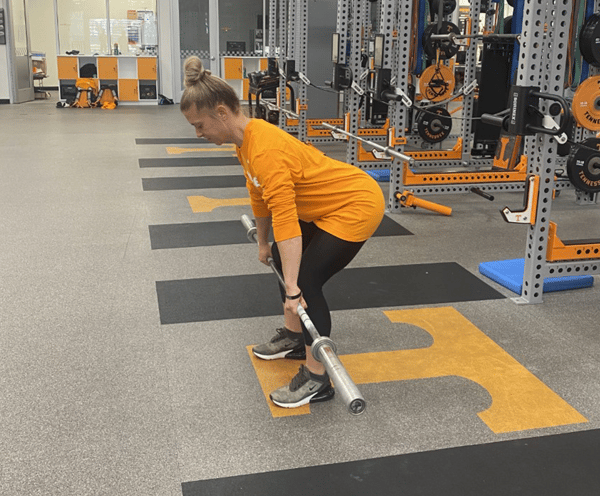
At this point, the athlete will transition below the knees. When transitioning past the knees the only movement should come from bending the knees until the barbell is at mid-shin. In this down position, a few technical points I look for are:
- Shoulders are in line with the barbell
- Back is tight and back angle has not changed position when transitioning below the knee
- The knees are below the hips and the hips are below the shoulders; this positioning is referred to as a “V-angle” when looking from the side
- Barbell is touching the shins and not in front of the athlete
- Weight is distributed through the ball of foot or toward the heels; toes are not lifted off the ground
Once this down position is achieved, the athlete will then initiate an upward movement of the bar. The range of motion during this movement will be limited and only span from mid-shin to below the knee and back down to mid-shin. Limiting the range of motion in this fashion teaches the 1st pull which will be the starting point when completing a power clean. During this phase I am looking for 2 things:
- Movement is coming from extending the knees
- Back angle does not change during movement
2. Top-Down Positions
This movement will be performed in a segmental fashion once an athlete has mastered the Clean Grip Deadlift. The bar will start at the hip and is then lowered into an RDL to the top of the knees. Transition the bar below the knee and lower to mid-shin. Once the empty barbell is at mid-shin, initiate the 1st pull, referred to as the Clean Grip Deadlift earlier in this article, transition past the knee, and finish with the bar at the hip.
Top-Down Positions should have intentional pausing at each of the following positions:
- Top of the knee on the way down
- Mid-Shin
- Bottom of the knee on the way up
Since the Top-Down Positions are beginning to put together all the movements that have been learned up to this point, it is important to make sure each position during this movement is executed properly. The pausing will reinforce the technique and allow for adjustments as needed.
3. Top-Down Positions + Shrug
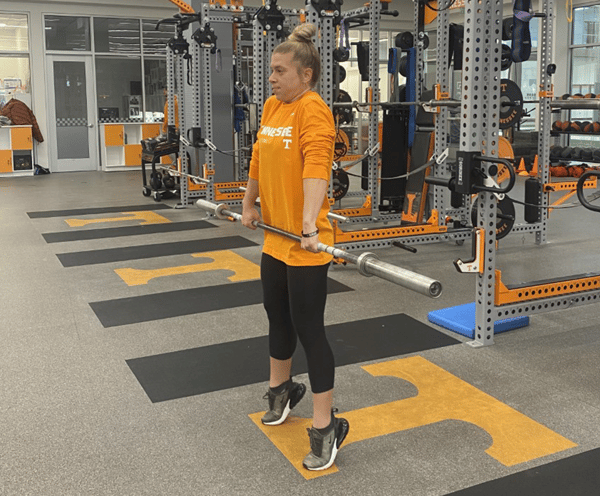
Assuming your teaching progressions have followed what is outlined in part 1 of this series as well as the previously mentioned step, Top-Down Positions, this is a simple progression. Begin in the same manner with the barbell starting at the hip, lowering to an RDL to the top of the knees, transitioning past the knee, and lowering to mid-shin. Initiate the 1st pull, referred to as the Clean Grip Deadlift, transition past the knee, and then shrug once the bar is at mid-thigh. Pausing at each position during this step can still be utilized but as the athletes perform more repetitions of this movement, the pausing can be minimal. During the shrug phase, I will cue:
- Shrug at mid-thigh
- Extend through ankles, knees and hips
- Bar stays close to body
- Arms stay loose
- Movement comes from shrugging shoulders toward ears (use your traps)
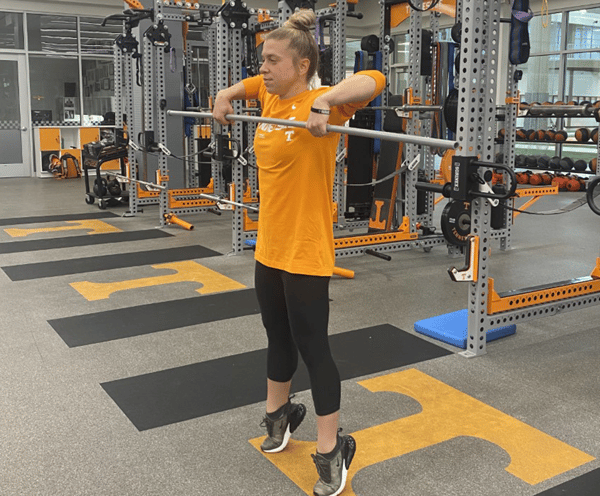
4. Impossible Clean
Next is the impossible clean, contrary to the name, it is possible to perform and teaches a high pull into the receiving position of a clean. I highly recommend using a PVC pipe or dowel rod for this step since it can be challenging to perform with an empty barbell. In this movement, the athlete will hold the barbell close to the body, while pulling the barbell up as high as possible. Elbows should be above the barbell while bent at roughly 90 degrees. Athletes will then be fully extended and hold the position until cued to receive the bar. A proper catch of the clean should look like the initial start of a front squat. Elbows are high, hips are back slightly, and weight is distributed through the whole foot. Once an athlete has received the barbell, ask which previous movement the catch of a clean looks like. They should be able to make the connection to a front squat.
Reinforcing the positioning of a clean catch by referring to the front squat helps athletes to make a connection as to what a proper catch should look and feel like. Once the athletes have caught a clean, I will ask them to hold the position then ask if they can properly front squat from that position.
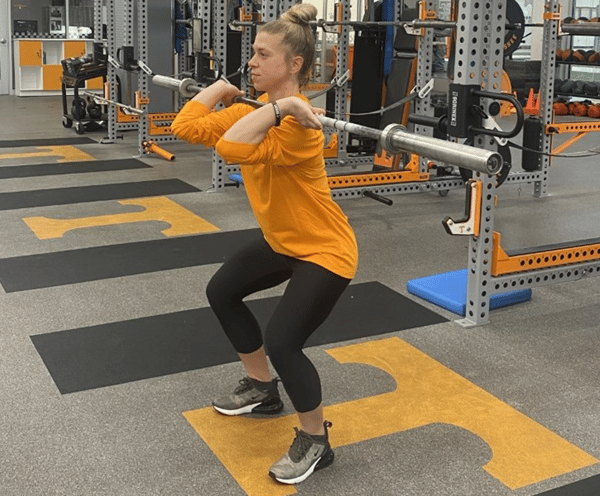
5. Top-Down Power Clean
In this step, the athlete will perform a complete clean. The barbell will begin at the hip before being lowered into position at mid-shin. Barbell movement upward is then initiated and finished with the barbell ending in the receiving or catch position. As previously mentioned, the catch position should look like the initial start of a front squat. Elbows are high, hips are back slightly, and weight is distributed through the whole foot.
6. Approach Power Clean
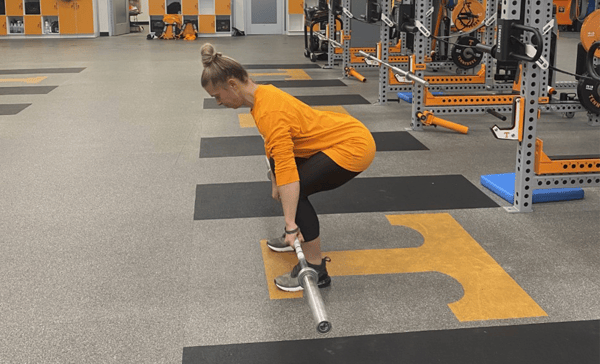
This is the final step in the process of learning a power clean. Light weight will be loaded on the barbell and if possible, large bumper plates of 10lbs can be utilized. The barbell will begin on the floor and the athlete will be required to approach the barbell and place themselves in the correct position without lowering themselves from the top-down. In the setup position I look for the following:
- Shoulders are in line with the barbell
- Back is tight
- The knees are below the hips and the hips are below the shoulders; this positioning is referred to as a “V-angle” when looking from the side
- Barbell is touching the shins and not in front of the athlete
- Weight is distributed through the ball of the foot or toward the heels; toes are not lifted off the ground
.png?width=600&height=497&name=Approach%20Clean%20(2).png)
Once the athlete has achieved a proper setup, the clean can be performed in one fluid movement. All positional pausing should be removed by this step. It is important to note that an athlete should not compromise quality of movement in order to bump up weight. Often, athletes want to add a lot of weight to a barbell once they begin performing Approach Power Cleans, but bumping in weight is earned by completing quality repetitions.
Final Tips for Success:
- Keep your coaching cues short, simple, and consistent.
- Demonstrate the movement and/or lift for the athlete.
- Use cadence to control the group; especially when working with a larger number of athletes. Cadence forces athletes to hold specific positions which reinforces technique.
- Move around while coaching to see lift from multiple angles.
- Repeat names of movements and lifts to familiarize athletes.
- Ask athletes questions to make sure they are understanding and retaining information.
- Give breaks. If you are speaking for a while, let the athletes put the barbell down.
- How quickly athletes move through a progression will be dependent on the group. Use discretion as a coach.

Cooks Before Chefs: 4 Steps to Teaching Young Coaches to Program

So You Want to Olympic Lift Your Team: Part 4 - The Power Snatch