Author Teofe Ziemnicki is TeamBuildr's Head of Sport Science and an accomplished Strength & Conditioning professional.
In a world of Sport Specific weight room movements, it seems like conditioning tests are still relegated to “run some 120’s” and call it a day. At the very least, conditioning still seems “behind the curve” when it should be the most “Sport Specific” aspect of training. In looking at the tests that were run before my time as the strength coach for hockey, I felt there could be some improvements to mirror what was happening on ice during a game.
Let's take a look at hockey as a sport. An average shift in hockey is 40-50 seconds. Span that across 4 lines rotating for 20 minutes, you’re looking at an average of 5-8 shifts per line. Obviously, every team rolls lines differently, your 4th line won't see the ice nearly as much as the first line, but in a test, we want to assume everyone should be ready for top 10% production values in case of injury/availability issues. Knowing the work intervals of 5-7 sprinting bouts, and the amount of time spent moving (~45 seconds) and time resting (~70-120 seconds), we have our work-to-rest ratio and our number of reps in our test.

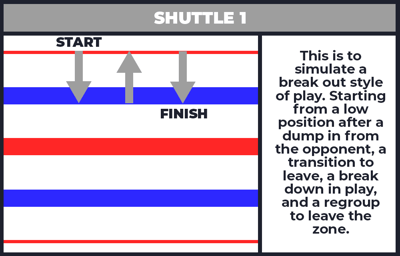
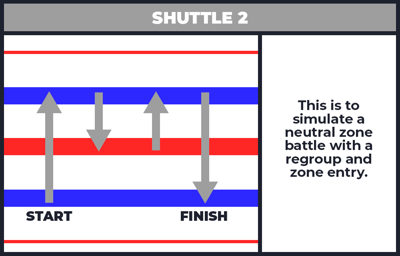
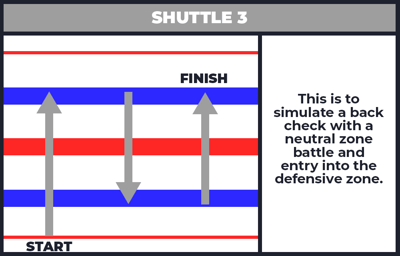
I first came up with an off-ice shuttle test. The team only had access to ice around mid to late September each year, but students arrived late August and coaches expected some sort of testing as soon as they arrived. What I needed to do was come up with a test that made sense for the team given the demands of the game. The off-ice test was a combination of shuttles. 40 yard sprint, 60 yard shuttle, 80 yard shuttle (see diagram below). The idea is the 40 yard sprint is a straight line sprint to mimic a back check moment in the game. The 60 yard shuttle is any back and forth battle in the neutral, offensive or defensive zone. The 80 yard shuttle is a battle in the offensive or defensive zone and breakout with a zone rush or a back check. Each shuttle had a gametime purpose that could be explained to the athletes.
This led to a large amount of buy-in and adherence to the testing protocols and procedures. The athletes felt it was fair and a close representation of what they needed to be asked of on the ice. How did I come up with the times for each shuttle? I had a few athletes stay in the summer and had them trial out the shuttles. I came to the consensus that if one of the fastest players could run a shuttle in 9 seconds, the rest of the team should be able to consistently hit that shuttle at 10. So I modeled it off of the player who would have been test-ready on her fastest shuttle and took 90% of her time and made that the standard for the first round of tests. Out of 18 girls who were able to run the test that fall, 3 failed. Which is an acceptable rate and the ones who did fail, admitted that they had done little conditioning for the majority of the summer.
Dry Land Testing
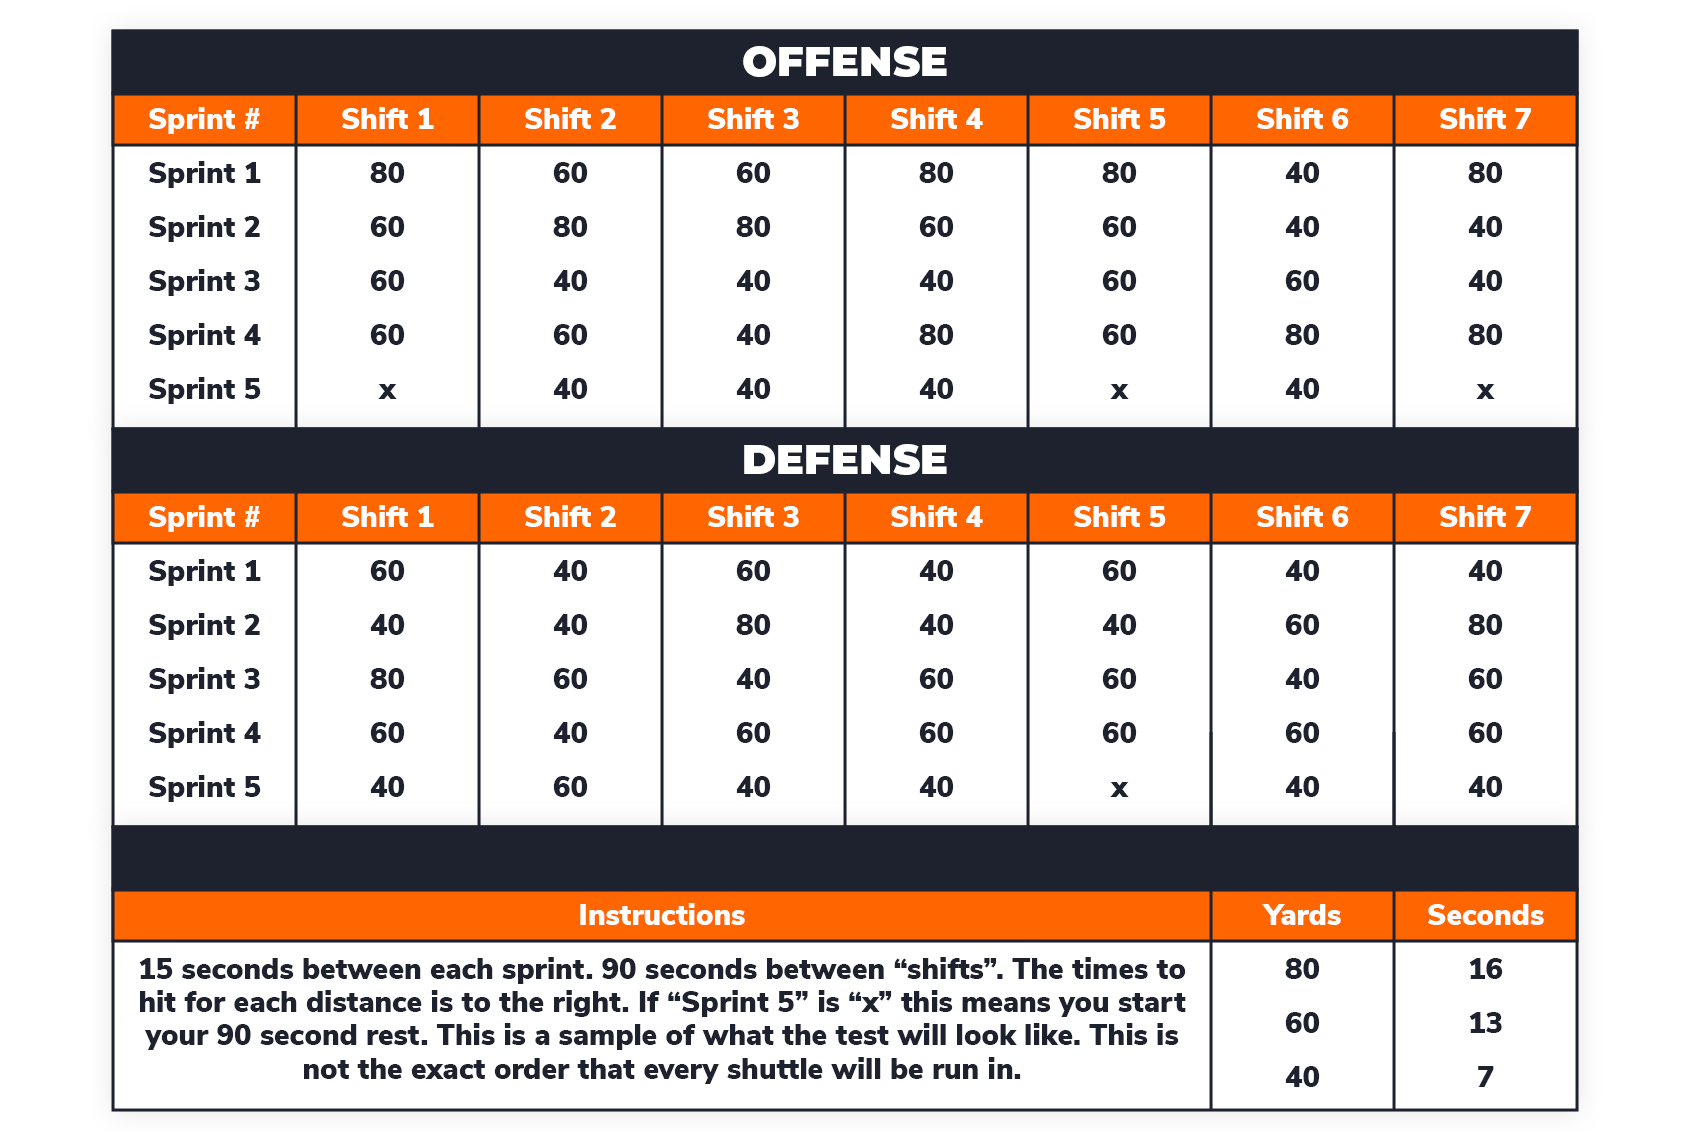
You’ll see that in the instructions I mention that the shuttle order is not the exact order they will be run in on test day. The reasoning for that is athletes cannot predict the pacing of the test. Therefore, they have to run each shuttle as close to max effort as possible. This adds the element of uncertainty and lack of control that a game brings. Unlike the softball test, athletes are allowed unlimited misses in this test, but makeup all those misses in “overtime”.
We had one athlete miss 7 shuttles and makeup 5 of them before failing her 6th, which resulted in a failure. But the effort and attempts were there and that showcased to the rest of the team that regardless of the situation in the game, they’ll need to put everything forward and they may not see the result they want, but the support from the rest of the team will always be there. Again, testing should be both geared towards the sport in its specificity to the energy systems but also allow for moments of comradery and ability to show determination to succeed in the face of adversity.
As a caveat and side note, let's talk about Goalies. The weird ones that can win you championships. How do you condition them? In my honest opinion, goalie is probably one of the most mentally driven positions and anytime I can make sure that a goalies headspace is clear for competition I will do that. But often when it comes to conditioning tests there are 3 routes I have seen. They need to run the test but the rule of pass/fail does not apply, they need to run the test and pass, or they don't have to run at all. In most cases, goalies want to run and pass a test to show the rest of the team they are with them but having a goalie do an 80-yard shuttle at full speed doesn’t quite add up for me. So I tried a few tests out and decided on a small-sided shuttle test. I’ll include the test format below.
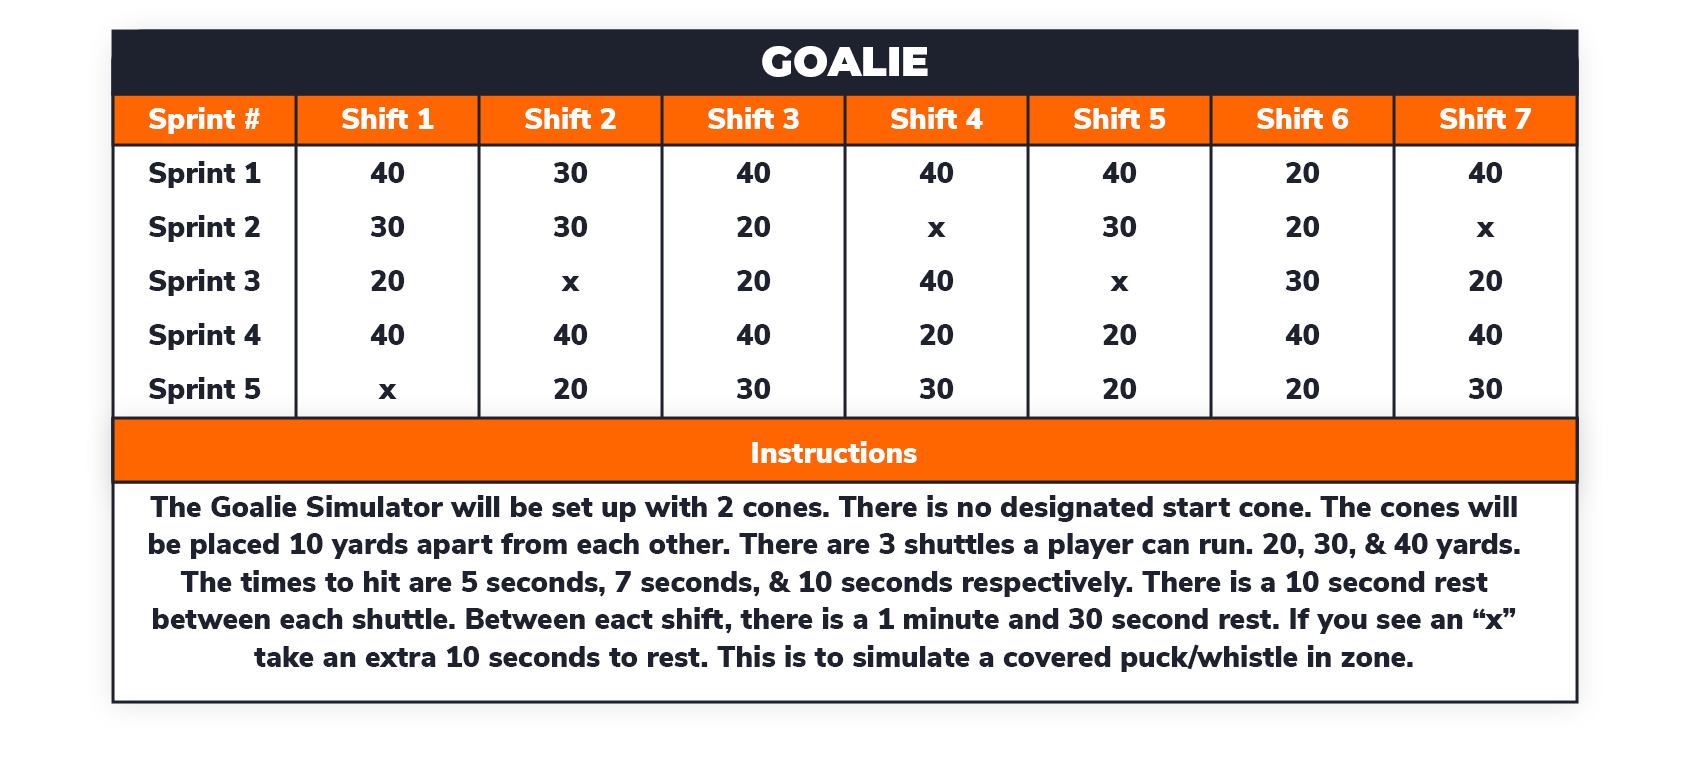 You’ll notice that the setup, rules and demands are similar to the skaters. This was to add the layer of “I did a test in parallel to the rest of the team but my demands of my position are unique and everyone can relate to that.” This satisfied the feeling of being absolved from responsibility that goalies want to avoid because of the possible animosity between them and players that might form. Overall, I believe this fits nicely with the position being played mostly within a 20-foot box on the ice and consistent lateral; stop and start movement.
On-Ice Conditioning
For the on-ice test, I used a similar approach. I will include those pictures below as well. 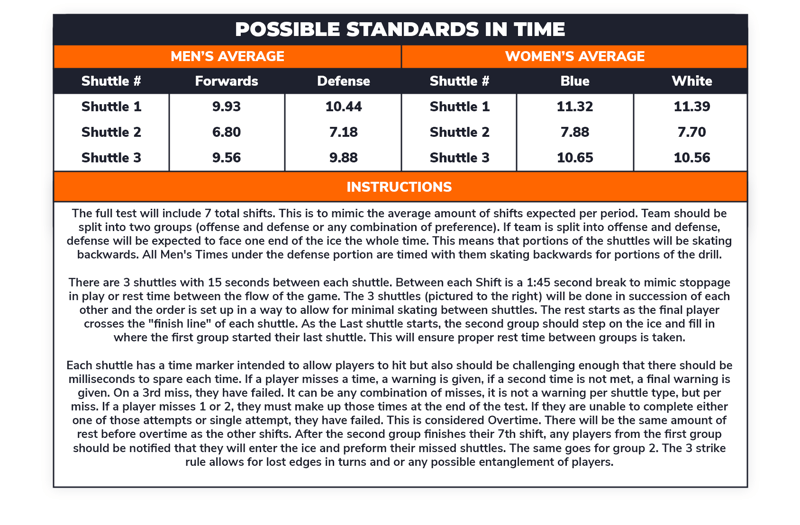
The times are taken while using this as a “Conditioning Drill” and around 4-5 reps, rather than in testing format. The test times would reflect the ability to consistently not fall behind because at the end of the day, the sport is about repeatability and this isn’t necessarily a speed test as much as it is a test to not drop seconds as the game goes on.
Times would be rounded up for the test, to keep timing even (not on the half second) and with the understanding that times would creep closer to the top across the board. Now, some teams might have athletes that are faster or slower given the level they are at. This is by no means a catch-all all and I do believe that standards SHOULD be re-evaluated consistently, especially on teams that have a consistent feature of the same athletes for an extended period of time. Think colleges, junior programs, and professional settings, not your youth teams where there is consistent turnover. So depending on your level, you may want to re-evaluate your times on a yearly basis. Having someone keep track of the times in which the first person crosses the line on each shuttle will give you an idea of how the standards can be leveraged to get people to commit more effort year over year as they “learn” the test.
Testing and Culture
I took time to really look into distances covered, time of play, time of shifts, break in play times, and average amount of time spent in play. I took those properties and truncated the information into a test that could be run in 30-40 minutes. The Ice hockey ones are set up to simulate 1 period. If you’re looking to make a change, specifically to buy in and culture, starting with the way you deliver something like a conditioning test can be a key component. It takes planning and logistics, but I feel these types of tests are both safe to run from a pure capabilities standpoint, and it’s engaging for everyone involved. You’ll notice I split the team into groups, the entire team doesn’t run together, they cheer the other group on, and outside of that positions have different demands. Defense doesn’t skate as far as offense usually in a game, but their uninterrupted skating is much longer distances. There’s a reason behind each parameter set in place for each test I created. That’s what people bought into the most.


How TeamBuildr Became a MLB Coaching Software for Strength Coaches
The TeamBuildr Approach to Long Term Athletic Development
